
About Wufoo
Wufoo allows you to build on line forms using a drag and drop interface. If you have many user request forms or need to display lots of fields conditionally, using tools such as Wufoo is a great way to present request forms to customers. By directing users to a form, you are more likely to be provided with all the details needed to process the request.
Unfortunately, there is no interface between Wufoo and Zendesk, but you can create tickets by emailing new forms from Wufoo to Zendesk.
Placing forms
You can place forms in your Help Centre within the body of an article. You can have as many forms as your Wufoo plan allows and place them in your Help Centre to suit your needs.
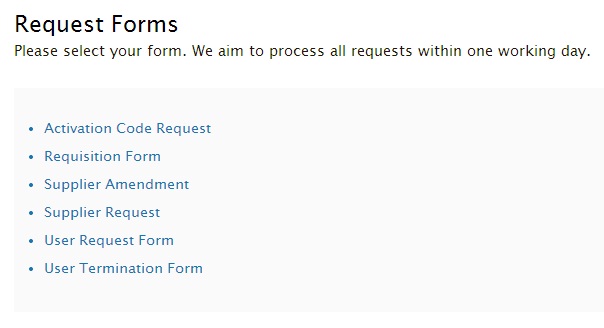
In the above example, the Help Centre section 'Request Forms' has 6 articles. Each article holds one form.
Alternatively, you can send customers a links to a form or create one article that includes all your form links.
Zendesk settings
Tickets will be processed by the mail API. This requires emails to be sent by an agent.
- Add the email 'no-reply@wufoo.com' to an agent's user profile
- Manually verify the no-reply@wufoo.com address.
To increase the API limit:
- White List 'no-reply@wufoo.com' under Admin>Customers
Help Centre settings
You must allow your Help Centre to display unsafe content to embed forms. In the Help Centre, go to General Settings and under security check 'Display unsafe content'. Be sure to read about unsafe content.
Wufoo support field
In your Wufoo form, you must include an email field to hold your support address.
- Give your field a descriptive name, e.g. 'Support eMail Address'
- Predefine the filed value with your Zendesk support address
- Show the field to 'Everyone'
- Add the 'hide' CSS Keyword
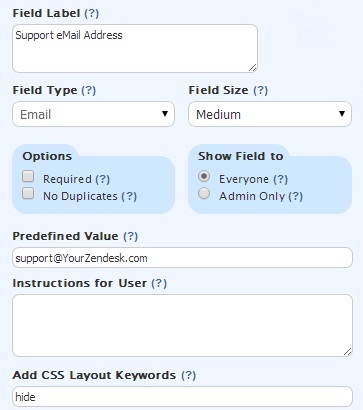
The support address field will be available to you when configuring your form but will not be visible to the customer when completing the form.
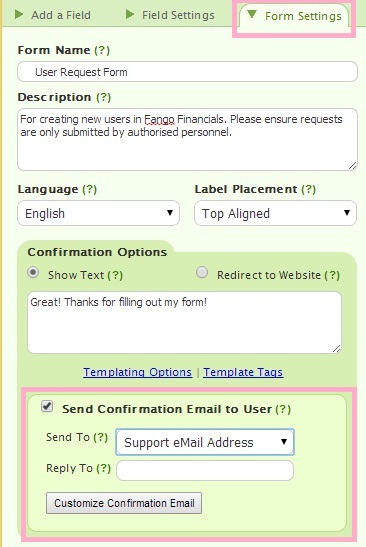
Form Settings
In your Wufoo Form, select the 'Form Settings' tab and enable the 'Send confirmation to user' option. Select the Support eMail Address as the 'Send To' option.
Including form content in tickets
Wufoo templating allows you to extract field values from your form. Each field has a unique reference number and its value can be found using:
-
{entry:Field1}
This will display the value in field 1.
We can use the template instructions to set the Zendesk mail API commands from fields in our form. For example, set the ticket requester to the user entered in field 1:
-
#requester {entry:Field1}
Confirmation eMail
The confirmation email will be sent to Zendesk to create a ticket from the form. Click 'Customize Confirmation Email' to edit the content.
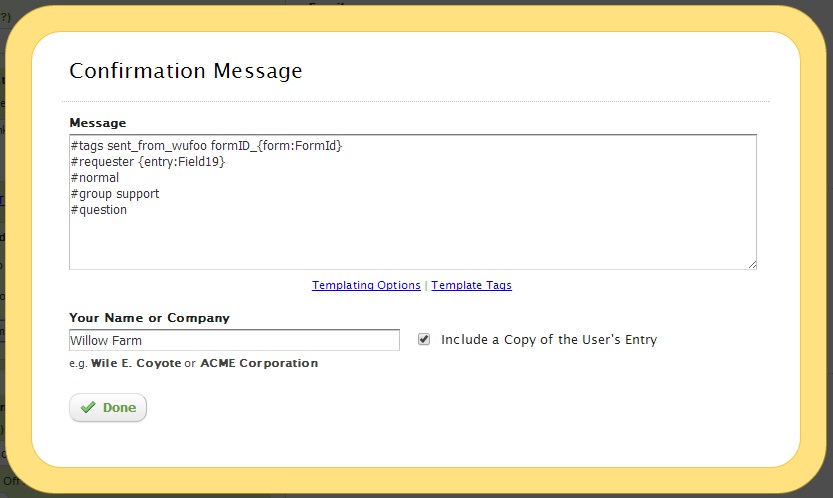
The first rows of the email contain the Zendesk mail API instructions. Use these to set ticket field values.
Here, we can set tag, the requester, priority and other system ticket fields.
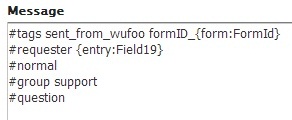
Use the 'Template Tags' link in the customisation screen to find the field numbers for your form. In the above the requester is set to the value of field 19. Note that the template instructions are case sensitive.
You could go on to design the confirmation email by placing each field value using templating. However, it is easier to check the 'Include a Copy of the User's entry' box. This will include all the visible filed values in the email.
Sharing the form
In Wufoo, from the Form Manager, select your form's 'share' option. Look for the 'Embed Code' section.
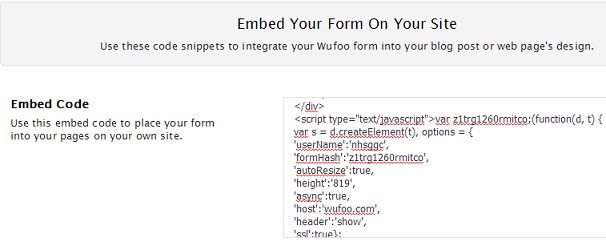
Copy the code in the right hand box.
In your Help Centre article, open the Source Code editor and paste the code from Wufoo.

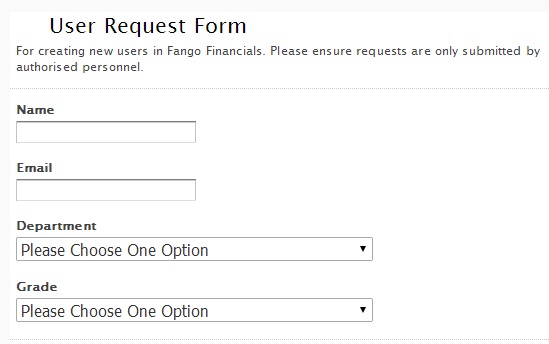
Final form
The form will be displayed within your article:
What makes it good
Directing users to forms means that:
- You are more likely to have complete information to process the request
- Tickets submitted to Zendesk are consistently presented
- Form fields can validate input before submission
- Form fields can be made required before submission.
- You can conditionally hide fields using rules in Wufoo. Only visible field values will be sent to Zendesk.
- You can set system ticket fields on submission of the form.
- You can set custom ticket fields that are associated with tags (check-box and drop-down field)
- You can modify the form in Wufoo and changes are automatically reflected in the article form- no need to embed again.
- You can use Wufoo custom field types and create forms using the drag and drop interface
Limitations
You are restricted to the features of the Zendesk mail API:
- You cannot set all custom ticket field values
- You cannot CC users
In addition:
- The confirmation email sent to Zendesk is in HTML format and so there may be some corruption in the ticket body.
- The embedded JavaScript code recommended by Wufoo may not play well with older browsers. Wufoo also provide an iFrame version that may be more suitable for some customers.
- Attachments remain in Wufoo and are not sent to Zendesk. Instead, the ticket will include a link to the Wufoo attachment. Removing the attachment in Wufoo will remove access from Zendesk.
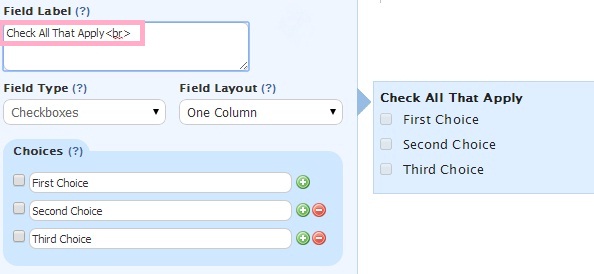
Refining field layout
You may need to add additional spacing either before or after the field label in Wufoo to ensure details are displayed well in the ticket. For example, for check-boxes, either place an extra carriage return after the field label or use a little HTML by adding '<br>'.
Dynamic settings
Because you have control over the display of fields on your Wufoo form and the layout of your confirmation email, you can set your API instructions like this:
-
#requester {entry:Field1}{entry:Field2}
Use Wufoo form rules to ensure that only one of these fields is visible. Whichever field is visible will be set as the ticket requester. See this example.
Comments
1 comment
Graeme Carmichael still going to go?
Please sign in to leave a comment.